 Troubleshooting a Filebased Server Install
When you install Web Connection it defaults into File based communication and a file based server requires that it can communicate with the Web Server via message files. There are a few things that can go wrong here either because a step was missed during setup or because a service is not running.
Do FoxPro and Web Server use the same Temp Path?
Filebased
The most important configuration setting for file based messaging is the temp path which has to match between the FoxPro and Web application configurations.
FoxPro Temp Path Setting
Filebased
You can check the FoxPro temp path in the <yourApp>.ini file in the TempFilePath and Template settings. These values can also be set on the server's Status form.
text[Main] Tempfilepath=c:\webconnection\fox\temp\ Template=WC_ ...
Note this path can also be relative:
textTempfilepath=.\temp\
Web.config Temp Path Setting for .NET Module
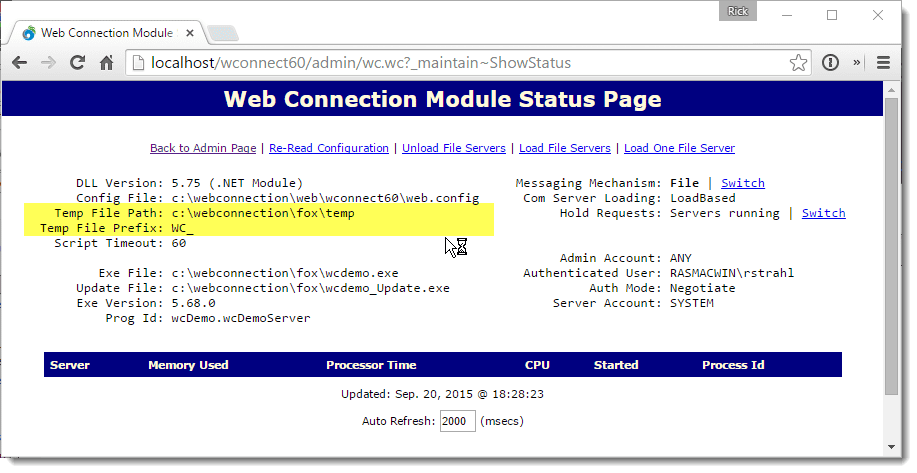
Filebased When using the .NET Module the temp path is set in web.config. You can quickly check the value by accessing the Module Configuration page from the Admin page:

This path is read from the following web.config settings:
        xml


     <configuration>
  <webConnectionConfiguration>
    <add key="MessagingMechanism" value="File"/>
    <add key="TempPath" value="~\..\..\deploy\temp"/>
<!--  <add key="TempPath" value="c:\wconnect\deploy\temp"/>  -->
    <add key="TempFilePrefix" value="WC_"/>
</configuration>
Note that the path can reference a Web relative path (as shown) or a fully qualified path (commented). The relative path reads: Root web folder, two folders back, then deploy\temp folder.
You can change the values in web.config and the new value is immediately live - no need to restart or reset anything as .NET config changes are applied immediately.
Using wc.ini for ISAPI Module
Like the .NET module you should first check the ISAPI Module Admin page to see where the temp path and template are pointing to as shown in the screen shot above. Make sure this value shows what you think it should.
If it's not correct you can change the value in wc.ini:
text[wwcgi] Mechanism=File Path=c:\wconnect\deploy\temp Template=wc_
To apply the changes either hit the Re-read Configuration link on the ISAPI Admin page, or restart IIS. Unlike the .NET module, changes have to be explicitly applied.
Temp Directory Existance and Permissions
Filebased
If you get an error that states that you don't have permissions for your temp directory, check to make sure that:
The Temp Folder specified exists
This one's pretty obvious, but it's not uncommon in a new install to forget to create the temp folder. I recommend you create the temp folder as part of your project in thedeployfolder and then use relative paths to avoid this from happening.IIS Application Pool User has rights to read/write
It's important that whatever user your Web application runs under has rights to read and write in the temp folder. You can use Module Admin page to see the actual user account that your server is running under (lower right corner of the display settings).In IIS you control the identity via the Application Pool security settings by setting the Application Pool Identity to the user of your choice. The default user is SYSTEM which should always work - be sure if you change accounts that you adjust the temp path permissions to include that user.
It's still not working - now what?
Ok, the above makes sure that the platform is properly configured. Let's make sure Web Connection is properly configured. To do this we want to make sure that the server's configuration file (YourApp.Ini or in the case of the demo WcDemo.Ini) and the Web Connection DLL INI file (wc.ini) are synched up properly.
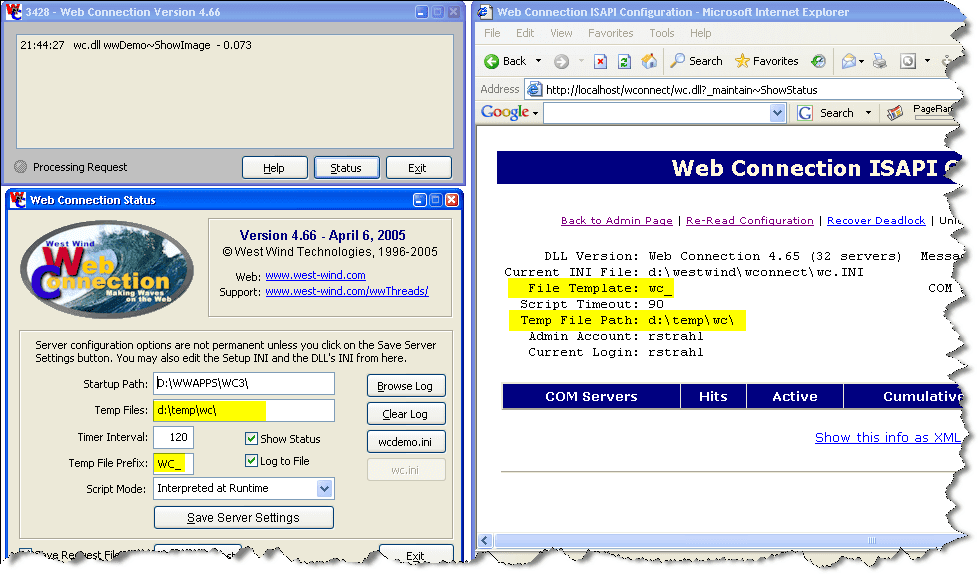
Start by running your Web Connection Server with Do <yourAppMain.prg> and bring up the Status form as shown in the image below. Make sure that the startup path shown in the form matches your actual startup path - if for some reason it doesn't change it to the install directory and Save Settings.
Next bring up the Admin page for your the demo or your application by going to:
http://localhost/wconnect/admin.asp
(or go to your application's admin.asp page). Click on Show and Manage ISAPI settings. We can now compare settings between the Web Connection server and the wc.dll setting the Web Connection DLL is running.

Pay attention the Temp File path and Templates - they should match in both places. Case won't matter, but make sure they are otherwise the same. If they are not we need to sync them.
Changing the your server's settings
To make changes to the application's INI file simply change the value on the Status form and click the Save Server Settings button. When you exist the form these settings should be live. These settings are written into your application's ini file (<yourApp.ini or wcDemo.ini for the demo app).
[Main]
Tempfilepath=d:\temp\wc\
Template=WC_
Changing the wc.ini settings
To make changes to the Web Connection ISAPI INI file find wc.ini in your Web directory or the bin directory. Open the file with a text editor or the Visual FoxPro editor.
[wwcgi]
Path=d:\temp\wc\
Template=wc_
You'll want to change the Path and Template keys to match the value from the server.
Once this change has been made, go back to the ISAPI DLL Admin page and click on the Re-Read Configuration button, which loads the new settings. Verify that the settings are changed in the status display.
© West Wind Technologies, 1996-2024 • Updated: 03/06/16
Comment or report problem with topic

