 Step 5 - Selecting and displaying a single customer
Let's start by selecting a single customer and displaying customer information about this customer. As with the Customer List in the previous step, we'll use a controller method to create the code to load the customer, and we then use a view to display the data.
The controller code very simple:
        foxpro


     FUNCTION Customer()

lcId = Request.QueryString("id")

loCustBus = CREATEOBJECT("cCustomer")
IF !loCustBus.Load(lcId)
   this.ErrorMsg("Invalid Customer",;
                     "An invalid customer id was supplied. Please make sure you select a valid customer and try again",;
                     "text/html",;
                     3,"CustomerList.ctd")

   RETURN
ENDIF

*** Grab Customer Object
poCustomer = loCustBus.oData

Response.ExpandScript()
ENDFUNC
We simply use the business object to look up the ID passed on the query string captured with Request.QueryString('id'). Using the business object .Load() method loads the specified record into the .oData member of the business object if found. We can then simply assign this data member to a PRIVATE poCustomer variable to pass to the view.
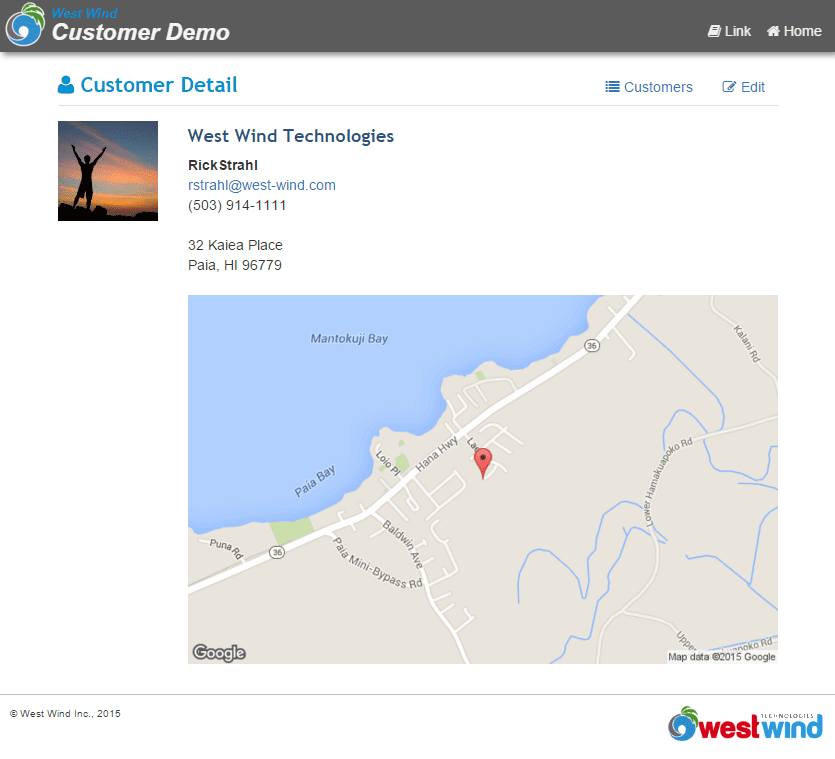
The View we'll be generating looks like this:

As you can see there are a few interesting features in this View - it uses a couple of social links to display the users picture based on a Gravatar which displays an image for a registered email address - anybody registered with the service will display an image. Otherwise a static image displays. If there's an address the address is mapped based on the address. You can click the map to jump directly to Google maps.
Here's the HTML View code:
        html


     <% pcPageTitle = poCustomer.Company + "- Customer Demo Sample" %>
<% Layout="~/views/_layoutpage.wcs" %>

<div class="container">
    <style>
        img {
            height: auto;
            max-width: 100%;
        }
    </style>

    <div class="pull-right">
        <a href="customerlist.ctd" class="btn btn-link">
            <i class="fa fa-list"></i> Customers
        </a>
        <a href="editcustomer.ctd?id=<%= poCustomer.Id %>" class="btn btn-link">
            <i class="fa fa-edit"></i> Edit
        </a>
    </div>
    <div class="page-header-text">
        <i class="fa fa-user"></i>
        Customer Detail
    </div>

    <div class="pull-left"><img src="<%= GravatarLink(poCustomer.Email,100) %>" /></div>
    <div style="margin-left: 130px;">

        <h3><%= poCustomer.Company %></h3>
        <div style="font-weight: bold">
            <%= poCustomer.FirstName %> <%= poCustomer.LastName %>
        </div>
        <div>
            <% if !EMPTY(poCustomer.Email) %>
            <a href="mailto:<%= poCustomer.Email %>"><%= poCustomer.Email %></a>
            <% endif %>
        </div>
        <div>
            <%= poCustomer.Phone %>
        </div>

        <div class="margin-top">
            <%= DisplayMemo(poCustomer.Address) %>
        </div>


        <% if !EMPTY(poCustomer.Address)
            lcAddress = CHRTRAN(poCustomer.Address,CHR(13),",")
            lcAddress = CHRTRAN(lcAddress,CHR(10),"")
            lcAddress = UrlEncode(lcAddress)
            %>
            <a id="map"
               href="https://maps.google.com/?q=<%= lcAddress %>"
               class="margin-top" style="display: block;" >
                <img src="http://maps.googleapis.com/maps/api/staticmap?center=<%= lcAddress %>&zoom=15&size=900x400&markers=color:red|<%= lcAddress %>" width="900" height="400" />
            </a>
        <% endif %>
    </div>
</div>
The basic databinding here is straight forward - we simply bind the various data fields as expressions using property names like < %= poCustomer.Company % > to display the customer. DisplayMemo() is used to display a field with line feeds in it so the lines break properly.
The Gravatar link is set with a Web Connection Utilitiy function called [GravatarLink()](VFPS://Topic/_3FA02J52T) which accepts an email address and image size.
The Google map is embedded and clicked on using the simple Google URL based APIs to which you can simply pass an address which displays the map and then also navigates when you click the link.
And that's all there's to this page. The business object's built-in default .Load() method abstracted so the code is trivially simple and the HTML simply references the object properties. The same works with complex objects or objects that have child collections of objects.
Next let's look how to edit and add new customers.
© West Wind Technologies, 1996-2024 • Updated: 01/18/16
Comment or report problem with topic

