 Step 6 - Create ToDo Entries
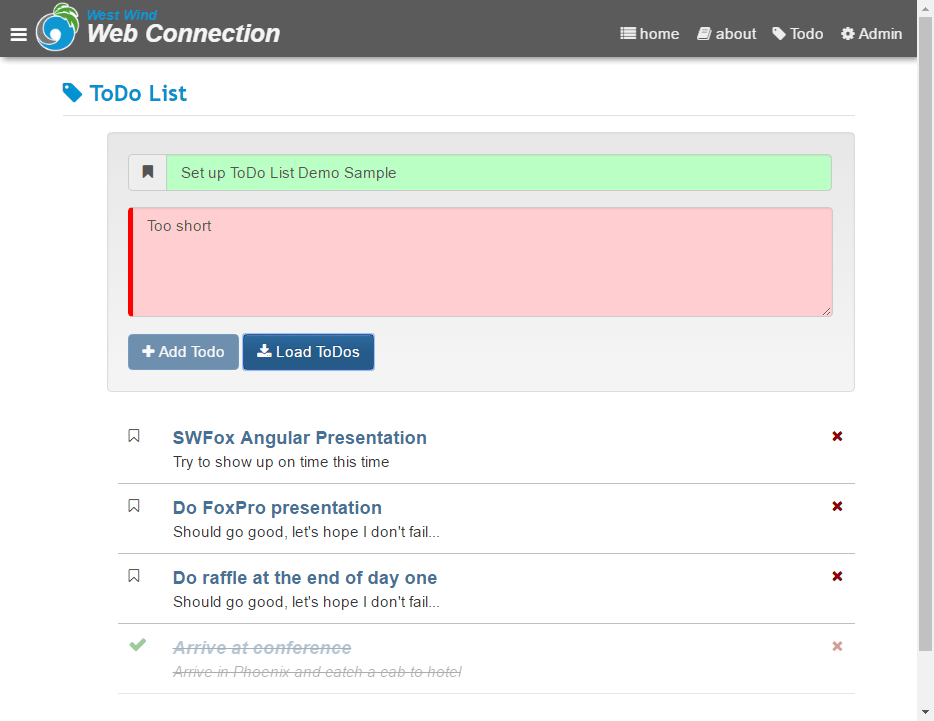
So at this point we can display a list of todo components - now lets add the ability to add some new ones. I'll create the following UI:

Let's start with the HTML - add the following to the top of the page above the list we've created so far:
<div class="todo-content">

    <div class="well">
        <form name="form1" id="form1" #form1="ngForm">
            <div class="form-group">
                <div class="input-group">
                    <span class="input-group-addon">
                        <i class="fa fa-bookmark"></i>
                    </span>
                    <input type="text" class="form-control"
                           id="name" name="name"
                           [(ngModel)]="activeTodo.title"
                           placeholder="Enter the title for this ToDo"
                           required />
                </div>
            </div>

            <div class="form-group">
                <textarea class="form-control"
                          id="description" name="description"
                          style="height: 100px"
                          [(ngModel)]="activeTodo.description"
                          minlength="10"
                          placeholder="Enter the description for this placeholder"
                          required></textarea>
            </div>

            <button class="btn btn-primary" type="button"
                    (click)="addTodo(activeTodo,form1)"
                    [disabled]="form1.invalid">
                <i class="fa fa-plus"></i> Add Todo
            </button>
            <button class="btn btn-primary" type="button"
                    (click)="loadTodos()">
                <i class="fa fa-download"></i>
                Load ToDos</button>
        </form>
    </div>

 <!-- list starts here -->
    <div *ngFor="let todo of todos">
I've already added in a bunch of functionality in this HTML markup, so let's look at things one at a time. First notice the two input controls have [(ngModel)] attributes to bind to the component's activeTodo instance. ActiveTodo starts out empty and is bound to the input fields.
Also notice the form which is set up like this:
<form name="form1" id="form1" #form1="ngForm">
Notice the #form="ngForm" which effectively creates a local variable called form1 that you can reference inside of the form. form1 then allows you to do things like check for .invalid or .pristine status or reset the form.
You can take advantage of this feature in the button which shouldn't be active when the form is invalid:
<button class="btn btn-primary" type="button"
        (click)="addTodo(activeTodo,form1)"
        [disabled]="form1.invalid">
    <i class="fa fa-plus"></i> Add Todo
</button>
Notice the [disabled] binding that disables the form if the form is not valid. The Title and Description fields both have required validators and the description has a minlength of 10 characters. These rules have to be met before form1.valid is true.
Adding a new Todo
After all of this UI and validation markup, adding of the Todo is anti-climactic. (click)="addTodo(activeTodo,form1)" fieds the addToDo() on the component which looks like this:
addTodo(todo,form) {
	this.todos.splice(0,0,todo);
    this.activeTodo = new TodoItem();
    form.reset();
}
This first line uses the Array.splice() method to push the todo item into the array at the top of the list. Array.push() is easier but it puts the added item at the end which is not optimal.
Once the item has been added to the array we have to create a new TodoItem. The original item went into the array and since the item is a reference, if we tried to add another we'd just be editing the original. So, we need to create a new TodoItem to force a new one to be created.
Finally the form has to be reset when the new item is added, otherwise clearing will immediately show an invalid (red) form as it isn't marked as pristine or untouched yet has invalid values in it. form1.reset() resets the form's state to pristine state so no errors show until you type and produce invalid input.
Cool we now can add items to the list.
© West Wind Technologies, 1996-2024 • Updated: 09/19/2016
Comment or report problem with topic

