 Step 3 - Hello World with Angular 2.0
Ok - now we are ready to start actually working with Angular and I'll use the Home component installed with the template to demonstrate a few basic features.
First always make sure the dev server is running by running:
npm start
Then browse to http://localhost:3000 and you should see:
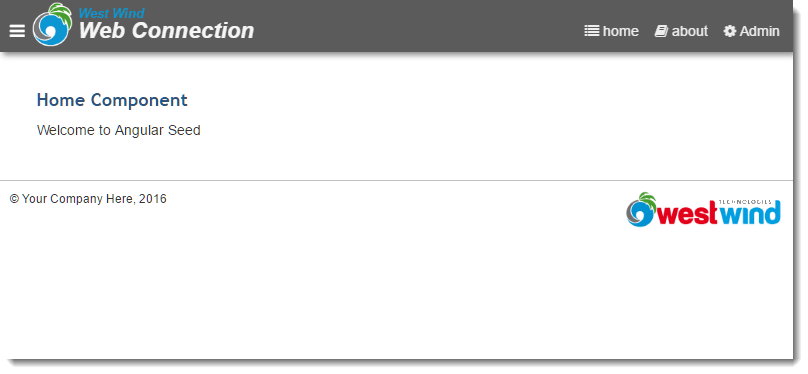
The page uses the common Web Connection styling template (which you can change of course) and a couple of menu items for home and 'about'. When you click on about the view switches on the client side without going back to the server to display the about page which also displays a static but different message.
Start by opening up the app/home/home.html template in an editor. The initial page is pretty basic and completely static. It has:
<h3>Home Component</h3>
<p>Welcome to Angular Seed</p>
Automatic Recompilation and Browser Refresh
There's nothing dynamic about this template at this point, but go ahead and make a change. Save your changes and the browser should automatically refresh and show you the changed HTML output. Note that you don't have to recompile or reload the page - the WebPack-Dev-Server running in the background is automatically transpiling any changed code, and then automatically refreshes the active HTML view in the browser which is really efficient for seeing changes immediately without doing anything.
Make the View Dynamic - Modify the Component
Changing static HTML is not very interesting, let's see how we can actually get some data into the view. To do this lets open up app/home/home.ts in the editor. The initial Typescript class is empty and looks like this:
import {Component} from '@angular/core';

@Component({
  selector: 'home',
  templateUrl: './home.html'
})
export class Home {

}
Let's break down what's happening here: The class imports the Component class from the Angular Core module. The reference refers to the Angular library and it's core module which exists in the node_modules folder where where all dependencies are installed. As you use other classes and components, you import then into the current file which makes them available for use. For now we have no other dependencies.
Next is the @Component meta data which is Angular specific information that lets Angular know something about the Component you are creating. Here we're specifying that this component represents can use a home selector that can be embedded into a page using the <home></home>. There are two ways to get components into a page - via the selector or via routing. In the starter template routing is used but the selector can be used to embed one component into another.
The templateUrl or template (which can be provided as a string), provide the rendering template for the component. Whatever HTML you provide in the template file or template string is used to render the component when it's referenced. You can embed expressions into these strings and use model binding to embed data into the template.
Finally there's the class definition which defines the data and logic for the component. Any properties and methods of the class are available to be referenced in the template - properties for data binding and events for handling events. The class is exported so it can be referenced and used or embedded by other components. If another component wants to use this component it can then import this component.
Add some Data
Let's modify the code by adding a couple of properties to the class and make it a little more dynamic. Let's add name and date properties like this:
export class Home {
	name:string = "Rick";
	date:Date = new Date();
}
Note that Typescript is optionally strongly typed. I can specify what type each property is, although in this case Typescript can actually figure it out on its own based on the values I assigned. Strong typing allows the Typescript to let you know when invalid values are assigned to a property or variable which can be very useful. Additionally it also helps with IntelliSense and describing the structure of objects and properties.
With the name and date properties defined we can now embed the values into the HTML template.
<h3>Home Component</h3>
<hr/>

<p>Welcome to Angular Seed, {{name}}.</p>
<p>The time is: {{date}}</p>
Which produces:
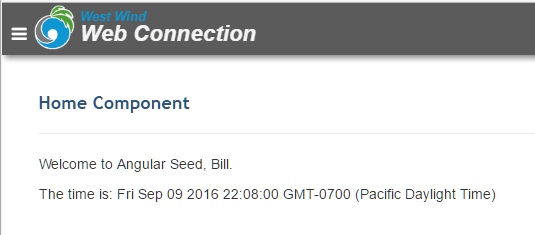
As you flip between about and home you should see the date value change - each time the home page is activated the view is rerendered and the value should change.
The date looks a little messy though - let's fix it with a date formatter applied using a pipe. Change the date display to:
<p>The time is: {{date | date:"MMM. dd, yyyy - hh:mm a"}}</p>
and you now get a clean date:
Sep. 09, 2016 - 10:15 PM
Updating Data
Let's add some functionality to change the name by adding an input box to the page.
<div class="form-group">
    <label for="firstname">What's your name:</label>
    <input type="text" name="firstname" id="firstname"
           class="form-control"
           [(ngModel)]="name"
           placeholder="Enter a name">
</div>
You can now simply type in the input box and the name in the Welcome message, changes as you type.
The key here is [(ngModel)]="name". What's happening is that we are binding - using the [(ngModel)] directive - the firstname textbox to the name property of the model - or the underlying class. When I change the input I'm effectively writing that value I type back into the model. As the model changes, any embedded expressions that reference the name property are immediately updated.
[(ngModel)]".- which is lovingly called banana in a box - provides both inbound and outbound data-binding to display the original value and the changed value. Angular uses punctuation marks to define what to bind and [prop] binds DOM attributes to properties of the class, which is the inbound binding. (event) usually binds events to methods of the class. [(ngModel)] is a special binding that combines inbound and outbound binding into one - hence the banana in a box.
Nice no? You now have easy two way data binding that immediately updates data.
Method Bindings
You can also bind to methods of the class in the same way. Let's add a method like this:
sayHello(name?:string) {
	if (!name)
		name = this.name;

	return "Hello " + name + ". Time is " + this.date;
}
You can now embed this value into the page
<p>{{sayHello()}}</p>
And it renders the message. If you change the name in the textbox, the name displayed originally as well as the method result are updated.
Demonstrating how dynamic Angular updates works
Now let's add some logic to automatically update the date time every second. To do this let's use JavaScript's setInterval() which repeats a function (or operation) at a specified interval.
In the constructor add:
constructor() {
	setInterval(()=> {
		this.date = new Date();
	},1000);
}
Save and go back to the browser and you should now see the time updating every second, in both the {{time}} and {{sayHello()}} expressions.
Cool, huh? Angular watches events as they occur including timers, DOM events, callbacks, custom events and without having to do anything special will update any bound values in the view template!
Handling Events
You can also handle events and route them to methods of the class. Let's add a method to the class:
clickHello() {
	alert(this.sayHello(this.name));
}
Then lets add a button to the page:
<button class="btn btn-primary"  type="button"
        (click)="clickHello()">Submit</button>
When you run the form now and click the button you will see an alert box that displays the hello message with the current name value that you typed.
Adding simple Validation
Angular also supports easy validation of form data via a very clean validation model. In order for this to work you have to wrap your input controls into a form like this:
<form name="form1" #form1="ngForm">
    <div class="form-group">
        <label for="firstname">What's your name:</label>
        <input type="text" name="firstname" id="firstname"
               class="form-control"
               [(ngModel)]="name" required minlength="5"
               placeholder="Enter a name">
    </div>

    <button class="btn btn-primary"  type="button"
            [disabled]="form1.invalid | form1.pristine"
            (click)="clickHello()">Submit</button>

</form>
Notice the required and minlength attributes on the textbox which require the form field to be filled out and that the text field is at least 5 characters long. If it isn't Angular automatically applies a few CSS styles to the controls and the form that are invalid - most importantly the .ng-invalid style which I define in CSS like this:
form input.ng-invalid {
    background: pink;
    border-left: 5px solid red;
}
Now when I type into the form control and the value is invalid I get a red highlight.
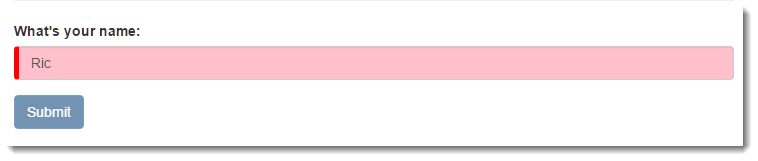
Also notice that the submit button is disabled as well. This is due to the following [disabled] attribute in the button:
[disabled]="form1.invalid | form1.pristine"
This uses property binding to the disabled property of the button, and a logical expression that checks the status of form1 by checking for invalid and pristine. The form shouldn't be submitted unless it's valid and unless the user has typed something.
It's super easy to create nice looking form validation using this approach. Angular exposes a number of CSS styles (ng-invalid, ng-valid, ng-pristine etc.) that you can easily review using your Web Browser's tools.
So now you've seen some of the core features of Angular 2.0 we can move on and create something a little more interesting.
Full Code
Here's the Home Component Typescript code (with a few minor enhancements):
import {Component, OnInit, OnDestroy} from '@angular/core';
import {DatePipe} from "@angular/common";

@Component({
  selector: 'home',
  styleUrls: ['./home.css'],
  templateUrl: './home.html'
})
export class Home implements  OnInit, OnDestroy {
	name= "Bill";
	date = new Date();
	intervalHandle = null;

	constructor() {
		this.intervalHandle = setInterval(()=> {
			this.date = new Date();
		},3000);
	}
	ngOnInit() {

	}
	ngOnDestroy() {
		clearInterval(this.intervalHandle);
	}

	sayHello(name?:string) {
		if (!name)
			name = this.name;

		// date formatter - same as template uses
		let timeString = new DatePipe('en-US').transform(this.date,'h:mm:ss a')

        // note this is a JavaScript interpolated string, not a template!
		return `Hello ${name}. Time is ${timeString}`;
	}

	clickHello() {
		alert(this.sayHello(this.name));
	}
}

Comment or report problem with topic