The Web store also includes a client viewer application that lets you download and store orders locally. Orders are downloaded from the Web site and stored locally. In addition you can process credit cards offline (using either AccessPoint or ClearCommerce/Linkpoint APIs), edit and update inventory offline and send it up to the server.
Note
The client application requires a separate set of data files from the online Web application. The client app installs into wwstore_client directory and requires that the application finds its data files there! Make sure that when you run the application you haven't previously run the wwStore from the Web site, otherwise you'll be looking at the server files rather than the client files with the viewer.
Note
The viewer must be run out the Web Connection root directory!
To start the client application you can click on WWSTORE_CLIENT.EXE from explorer or DO WWS_CLIENT from the Web Connection install directory. You should see the viewer pop up and show you any existing orders.
Offline Viewer Configuration
The offline viewer application is configured via the Config application you can find by clicking on the Config button on the form. The configurations sets up how the application communicates with the Web server, how offline credit card validation is accessed, and how confirmation emails are sent.
The first page of the form configures how the client application communicates with the Web server:
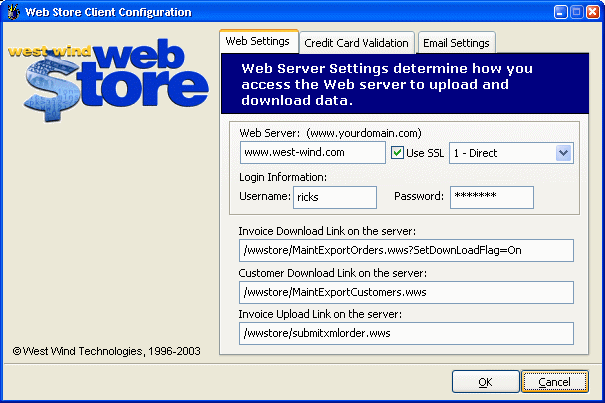
WebServer
The Web server that orders and customers are downloaded from. Change this to localhost for testing. Click the SSL link if you want to communicate using HTTPS (recommended) for downloading data from the server. You can also pick the type of connection that is made. Typically you'll want to use 1 - IE Settings which means IE's configuration settings are used. You can use 3 - Proxy if you have a proxy server in place and connection with mode 1 doesn't work. These settings map wwIPStuff's nHTTPConnectType property.
Admin Username and Password
In order to access the server and download orders a password maybe required, depending on how you have your Web store server set up. Security is set up using Web Connection's standard Basic Authentication security through a setting in the server's INI file with a key called AdminUser. By default this value is set to Any which allows any valid username/password combination into the Web server. You can also set it to a specific user, or leave it blank to use no authentication (not recommended). See Web Connection's wwProcess::Login method for more details on values you can use on the server.
The client must provide the proper authentication by providing the appropriate username/password here, otherwise you'll receive an error notice on download attempts.
InvoiceWebLink
The Web link shoudn't be touched - it points at the server method that handles the the order export. Orders are exported as hierarchical XML. You can look at the client application's ImportXMLOrders to see how importing this XML is handled. The SetDownloadFlag parameter determines whether the download marks the orders as downloaded and causes a download to only pull undownloaded files to the client. This should be set on by default. Download flags can be switched from the admin page on the invoice viewer.
CustomerWebLink
This link is used to download customer records for a given date range. The import occurs with PK comparisons and overwrites updates from the Web site if the name and PK match. If names are different a dialog prompts on whether you want to update or add a new record.
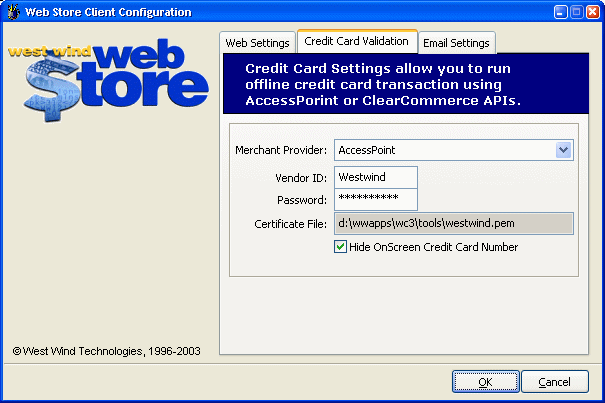
The client can be used for offline credit card processing and this second page configures the viewer with one of the supported providers.
StoreName
This is the ID for the store provided by your Merchant Provider. ClearCommerce calls this the StoreNumber. AccessPoint calls it the storename.
Store Password
Required only by ClearCommerce this is the password for your store that must be passed up to the validation server with each request.
Certificate File
Required only by ClearCommerce this is the location of the secure certificate provided to you from ClearCommerce to provide client side authentication that matches your store.
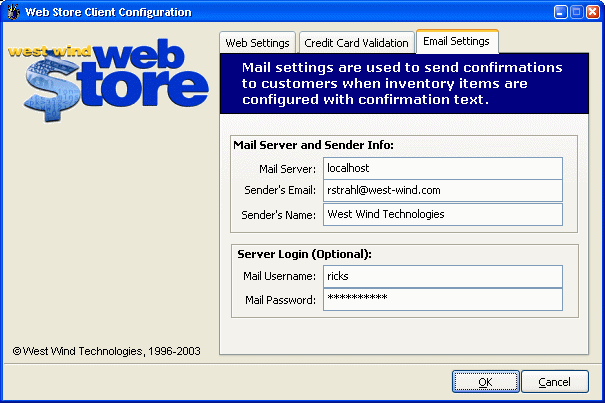
The offline viewer can also send confirmation emails to customers. If you do offline processing of orders and you provide some sort of electronic good it's handy to automatically fire off an email to the recipient. You can do this by setting up the inventory item with a confirmation note that gets emailed to the customer if not empty.
The settings on this screen specify how the email is sent and the return email address is displayed.
All of these settings configured in the Config form are stored in an INI file - wwstore.ini:
[config]
;*** Download information
Webserver=localhost
Secure=Off
HTTPConnectType=0  ; wwipstuff nHTTPConnectType
Adminusername=ntusernameforserver
Adminpassword=ntpasswordforserver
Customerweblink=/wwstore/MaintExportCustomers.wws
Invoiceweblink=/wwstore/MaintExportOrders.wws?SetDownLoadFlag=On

CCStoreType=AccessPoint  ; ClearCommerce
CCStoreName=yourstoreid
CCPassword=yourpassword     ; ClearCommerce only
CCCertfile=d:\wwapps\wc3\tools\westwind.pem  ; ClearCommerce only

Mailserver=mail.yourserver.com
Senderemail=rstrahl@west-wind.com
Sendername=West Wind Technologies
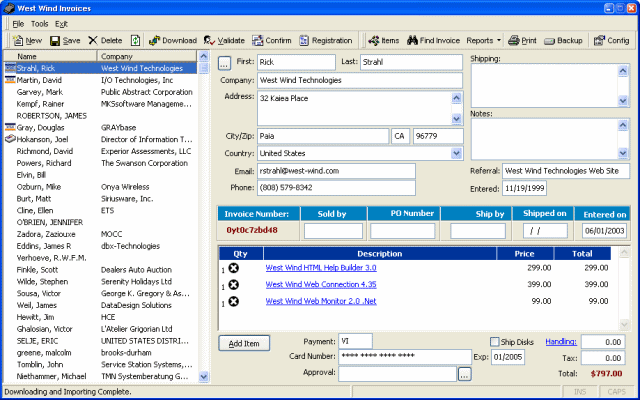
Downloading orders from the Web server
You can download orders from the Web server by clicking on the Download icon on the toolbar. Make sure you configured the INI file above properly to point at your Web server and enable the proper security on the server. The application connects to the Web site and downloads orders in XML format. The orders are imported back into invoices on the client side and show for viewing.
New orders that are downloaded are marked with a * and + sign. The * means the order has not been approved, the plus sign means it has not been shipped yet. Only approved orders don't show the * - orders that have not been processed have an empty approval field. Orders that are marked DECLINED, FRAUD or FAILED also are marked with the *. The two values that trigger the * off are APPROVED, DUE or PAID (which can be used for Check or PO orders).
We tend to use DUE AND PAYABLE for PO orders, PAID for check orders, and APPROVED for Credit Card Operations (which is automtically filled in when the order is processed).
You can also enter orders such as phone or mail/PO orders manually by clicking on the New button. If the customer is a previous customer you can click on the ... button next to the First Name field to select an existing customer.
Validating Credit Cards
Once orders have been downloaded from the Web you can validate the credit cards offline.
The default implementation of the store doesn't provide online credit card validation, because many of our products require validation of user's previous orders which is impossible to do online since not all order info is online. Credit Card Validation is handled via a pair of classes with identical interfaces - wwAccessPoint and wwClearCommerce - that can be easily plugged into the Web application if you need it to. You can look at the ccValidateOrder method of the Invoice form to see how this is done easily.
If you use offline processing like we do make sure you configure wwstore.ini for the appropriate validation scheme and password/validation scheme as described above. Make sure the Web server is set as well and pick secure transmission if your server supports SSL. Make sure you're online before running these operations otherwise you'll wait for about 30 seconds before getting an error message back.
Click the Download link and let it go. The application now goes out and processes all orders that have empty Approval fields.The application uses the appropriate APIs to communicate with the merchant service over a TCP/IP connection. One order at a time is run in a loop - you should be able to see the current record processed in the status bar display.
When the validation is complete you should see the * mark gone on all orders that were APPROVED. Any failed orders will continue to show a *. You can access those and click on the ... button next to the APPROVAL field to get more information about what went wrong. Note that all orders are still marked with a + at this time which means their Shipped On date is still empty.
When running credit cards we suggest you test with orders to yourself with small amounts like $1.00. Note that you can change the order total manually if necessary.
Confirming an order
Once an order has been placed and completed you can choose to complete the order by shipping the product. If you're shipping software electronically you can do this easily with an email confirmation. Each Inventory item can be set up with a confirmation message that is sent to the email address specified when you click on the Confirm button. The application goes through each item in the current order and sends a confirmation message if one exists. It also updates the Shipped On date to today's date.
You can also manually change the Shipped on Date as necessary. Note that you can use Quicken type hotkeys in all date fields of the form - pressing T sets the date to Today.
Note the Confirm option is fairly specific to West Wind's business model where 90% of all orders are electronically shipped via email notification links. You may not have use for this behavior and you can change how it works easily enough in the Invoice form.
If you process credit cards online you probably want to update the Shipped on date at the time that an order is approved online using the oItem.oData.ShippedOn property.
Find Invoice
Note that the Invoice list on the left of the application only shows invoices for the last three months. This is to keep the list down to size and keep it running reasonably fast. You can find older invoices by searching for them using the Find Invoice button on the toolbar:
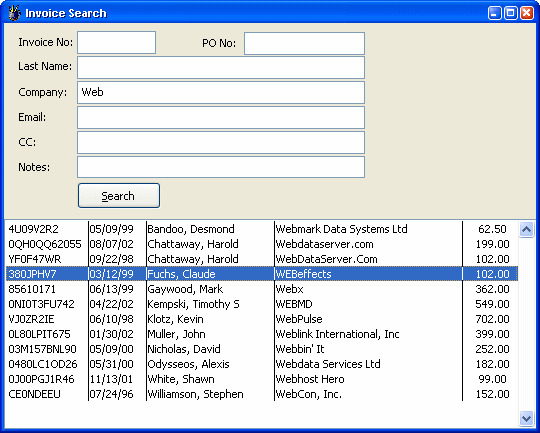
Put in the search criteria and you will get a list of all matching entries. Double click on the match you want to look at to bring it up in the Invoice viewer.
Printing
You can print a physical invoice to a printer using the Print option. A dialog will allow you to select a printer to send the invoice to.
Editing Inventory
An inventory viewer is provided to let you edit inventory offline and optionally upload individual items or the entire file to the Web server.
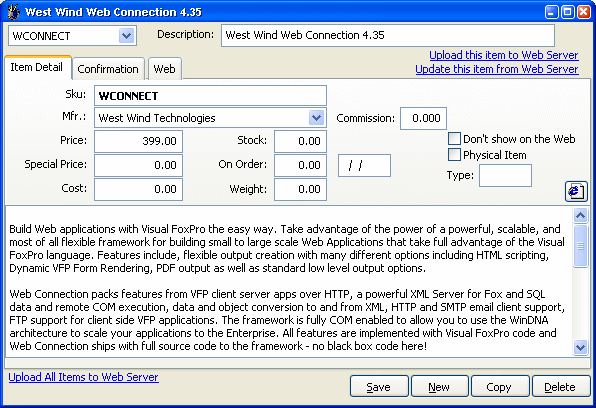
The item detail shows standard inventory fields that shouldn't need much explanation.
Note the check boxes for Physical item and Don't Show on the Web. Some items may not be useful to be shown on the Web such as comments and notes. Checking this checkbox keeps items from displaying in the item selection lists on the Web server.
The Physical flag determines whether the item is treated as a stock based inventory item. Checking this flag causes stock to be updated for the item and stock to be checked before allowing an item to be ordered. Use this for items like books, but don't check it for non-stock items and electronically delivered software. No check means simply the Stock values aren't updated.
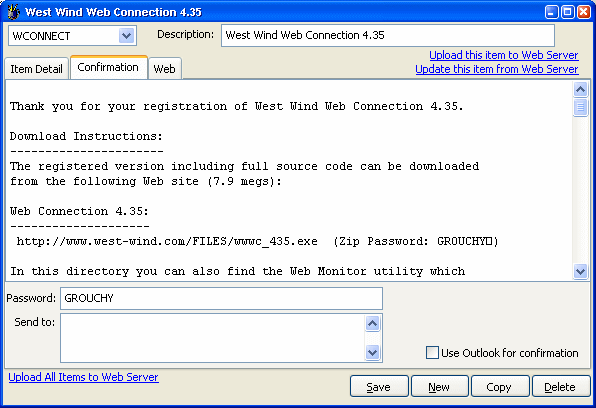
The second page contains information about confirmation emails that can be sent for specific items. If the confirmation text is filled in clicking the Confirmation button in the form causes each item that has text here to send an email to the customer.
The SendTo field allows you specify email addresses for third party vendors that might need to know that an item was sold. For example, the West Wind Store sells books for EPS Software of Markus Egger's Advance OO book. When order comes in the Send To field is set to Markus' email address and he receives a notification (in XML format) on the item and order.
Order Number: 02E164DCM13
The following item has shipped:

Fox Extension Classes (Interface Series)
    Qty: 1
  Price:     199.00
  Total:       0.00
--------------
<?xml version="1.0"?>
<westwindstore>
	<itemsold>
		<invoicenumber>02E164DCM13</invoicenumber>
		<name>John Doe</name>
		<company>Does Nix</company>
		<address><![CDATA[1458 Francis Rd
Victoria, BC V8N 2
Canada]]></address>
		<shipping><![CDATA[]]></shipping>
		<email>johnd@doesnix.com</email>
		<phone>250-595-1124</phone>
		<sku>FOXEXT</sku>
		<descript>Fox Extension Classes (Interface Series)</descript>
		<qty>1</qty>
		<price>199</price>
		<itemtotal>0</itemtotal>
	</itemsold>
<westwindstore>
This behavior is very custom to West Wind, but you can obviously override it in the Invoice form's ConfirmOrder method. For example it'd be very easy to adapt this behavior to post the XML to a Web server letting the client know what's been provided.
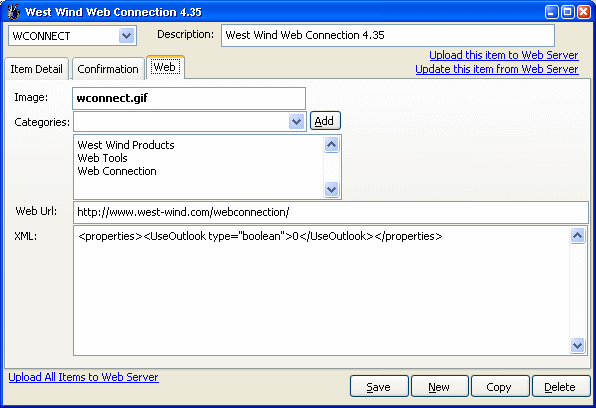
The last page provides some configuration how data is displayed on the Web site.
Image
Specify a name here of an image that will live in the itemimages directory off the Web store's Web directory. If this field is blank no image is displayed otherwise the image reference is used. Note that you can specify additional relative directories in the itemimages tree on the Web site such as: newdir/images/image.gif.
Categories
The category field determines which categories an item shows in on the Web site. The categories are determined by the CATEGORY entries in wws_lookups. Enter each category you want the item to appear in and put each item onto a separate line.
XML
This field is not currently used, but you can use it to store additional custom property values.
